Tables can be used to not only present information in boxes, but also to help you format a page. Here's what you'll learn:
Inserting a Table
- Click the 'Table' button on the Easy Editor toolbar.

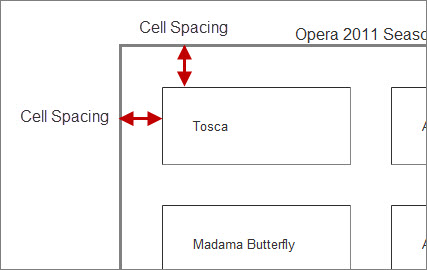
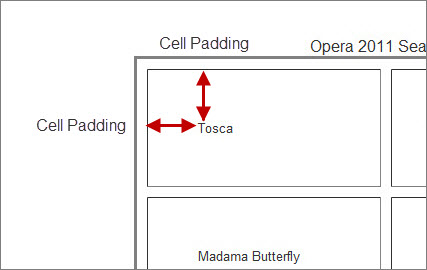
- The Table Properties window pops up with the following options:

Here's what each option means:


Height: Most of the time, you'll want to leave this empty. Then, your height will adjust to whatever information you put inside (e.g. 3 lines of text, an image).
Width: If you leave this blank, the table will adjust itself to your content.
Border Size: If you set this to 0, the borders will be invisible.

Summary: This doesn't show on your table, but is information that search engines may read so that they know what your table is about.
To edit the properties of a table already inserted:
- Right-click on your table and select 'Table Properties'.

- The Table Properties window will pop up where changes can be made.
Adding/Deleting Rows, Columns and Table Cells
To add or delete a row:
- Right-click on the table cell a) you want the new row to be above or below b) you want to delete.
- Left-click on 'Row'.
- Click 'Insert Row Before' to put the new row above your table cell. Click 'Insert Row After' to put the new row below your table cell. Click 'Delete Rows' to remove the row of your table cell.

To add or delete a column:
- Right-click on the table cell a) you want the new column to be to the left or right of or b) you want to delete.
- Left-click on 'Column'.
- Click 'Insert Column Before' to put the new column to the left of your table cell. Click 'Insert Column After' to put the new column to the right of your table cell. Click 'Delete Columns' to remove the column your table cell is in.

To add or delete a table cell:
- Right-click on the table cell a) you want the new table cell to be to the left or right of or b) you want to delete.
- Left-click on 'Cell'.
- Click 'Insert Cell Before' to put the new cell to the left of your table cell. Click 'Insert Cell After' to put the new cell to the right of your table cell. Click 'Delete Cells' to remove your table cell.

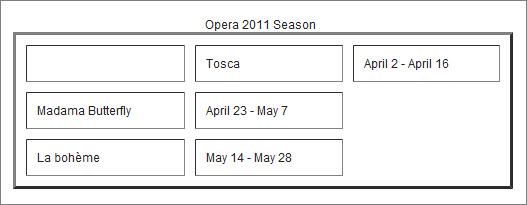
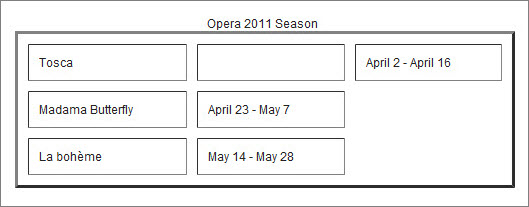
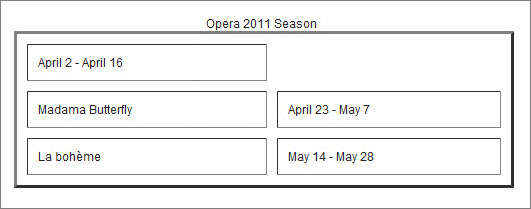
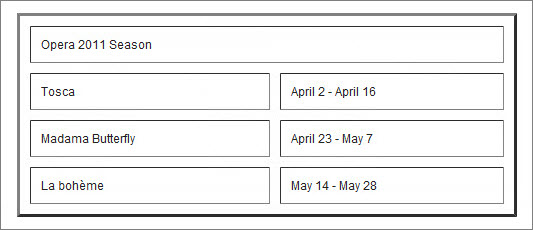
Pretend you right-click on table cell 'Tosca,' you get the following results:
Insert Cell Before:
Insert Cell After:
Delete Cells:
Merging/Splitting Table Cells
To merge 2 cells in a row:
- Right-click on the leftmost table cell in the group of 2 cells you want to merge.
- Left-click on 'Cell' -> 'Merge Right'.

- The result is:
To merge 2 cells in a column:
- Right-click on the top table cell in the group of 2 cells you want to merge.
- Left-click on 'Cell' -> 'Merge Down'.
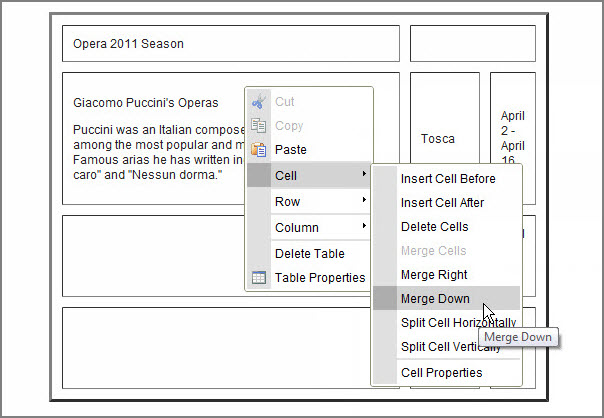
- The result is:

To split a cell into 2 cells:
- Right-Click in the cell you want to split and then left-click on 'Cell.'
- Click 'Split Cell Horizontally' or 'Split Cell Vertically.'

The result if you split horizontally on "Madama Butterfly" is:

The result if you split vertically on "Madama Butterfly" is:

Editing Cell Properties
You can change the properties of individual cells within your table.
- Right-click within the cell you want to modify and then left-click on 'Cell' -> 'Cell Properties'.

- The Cell Properties window will pop up.

| Width |
You can enter the width of the cell either by pixels or by percentage of the table's width. |
| Height |
You can enter the height of the cell either by pixels or by percentage of the table's height. |
| Word Wrap |
Select 'Yes' or 'No'. If you select 'Yes', your text will be made to fit neatly in your cell. Text will automatically move to the lines below as you type. If you select 'No', the cell will grow to the right to fit all your text on one line (unless you hit the Enter button to move text to the next line below). |
| Horizontal Alignment |
Select from the dropdown menu where in the cell you'd like your text positioned: left, right, or center. |
| Vertical Alignment |
Select from the dropdown menu where in the cell you'd like your text positioned: top, middle, bottom, or baseline. |
| Rows Span |
Select how many rows you want the cell to span. If you select more than one, the column the cell is in will be extended. |
| Columns Span |
Select how many columns you want the cell to span. If you select more than one, the row the cell is in will be extended. |
| Background Color |
Select a color to fill the cell. Click the 'Choose' button -> click on a color and then 'OK.' |
| Border Color |
Select a color for the border of the cell. Click the 'Choose' button -> click on a color and then 'OK.' |
|

